Hugo Generate Site
两种搭建个人博客的方式
一.相关工具概念了解/安装
1.git
Git is a free and open source distributed version control system designed to handle everything from small to very large projects with speed and efficiency.
管理您的本地/远程代码的工具,负责推动/拉取代码或分支等操作
需要了解的命令:
git pull
git push
git add
git commit
git submodule
2.hugo
Hugo is one of the most popular open-source static site generators. With its amazing speed and flexibility, Hugo makes building websites fun again.
生成静态网站的工具,您需要使用此工具生成您的静态网站代码。
3.github
GitHub is where over 56 million developers shape the future of software, together. Contribute to the open source community, manage your Git repositories, review code like a pro, track bugs and features, power your CI/CD and DevOps workflows, and secure code before you commit it.
存放代码的网站,你需要在这里托管您的代码,部署也就需要您将本地代码推送到这个地方即可。
4.linux基本操作
二.搭建方式
针对不熟悉以上工具的人群,建议使用第二种方式,简单执行脚本即可搭建完成本机博客网站,并简单推送代码。
1.本机电脑环境搭建
1).安装git
基于kali安装:sudo apt install git
2).安装hugo
基于kali安装:sudo apt install hugo
3).github相关
我将使用两个repository存储网站源代码和网站部署代码
如果您想使用一个repository的方式可以参考hugo官方文档
-
注册github:您的昵称将和您的网站域名一样
-
创建存放代码的repositories
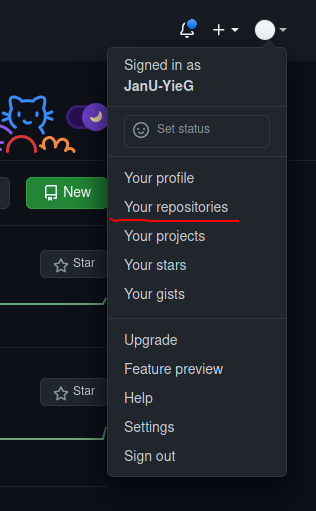
点击个人头像后,点击your repositories

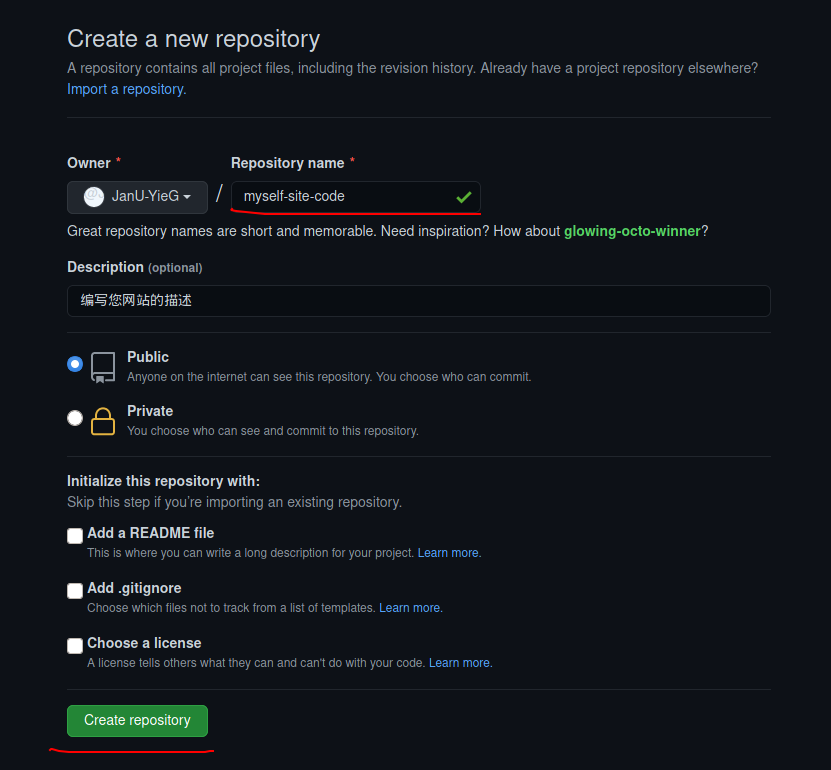
之后点击new按钮创建您的代码仓库

填写必要信息之后点击create repository

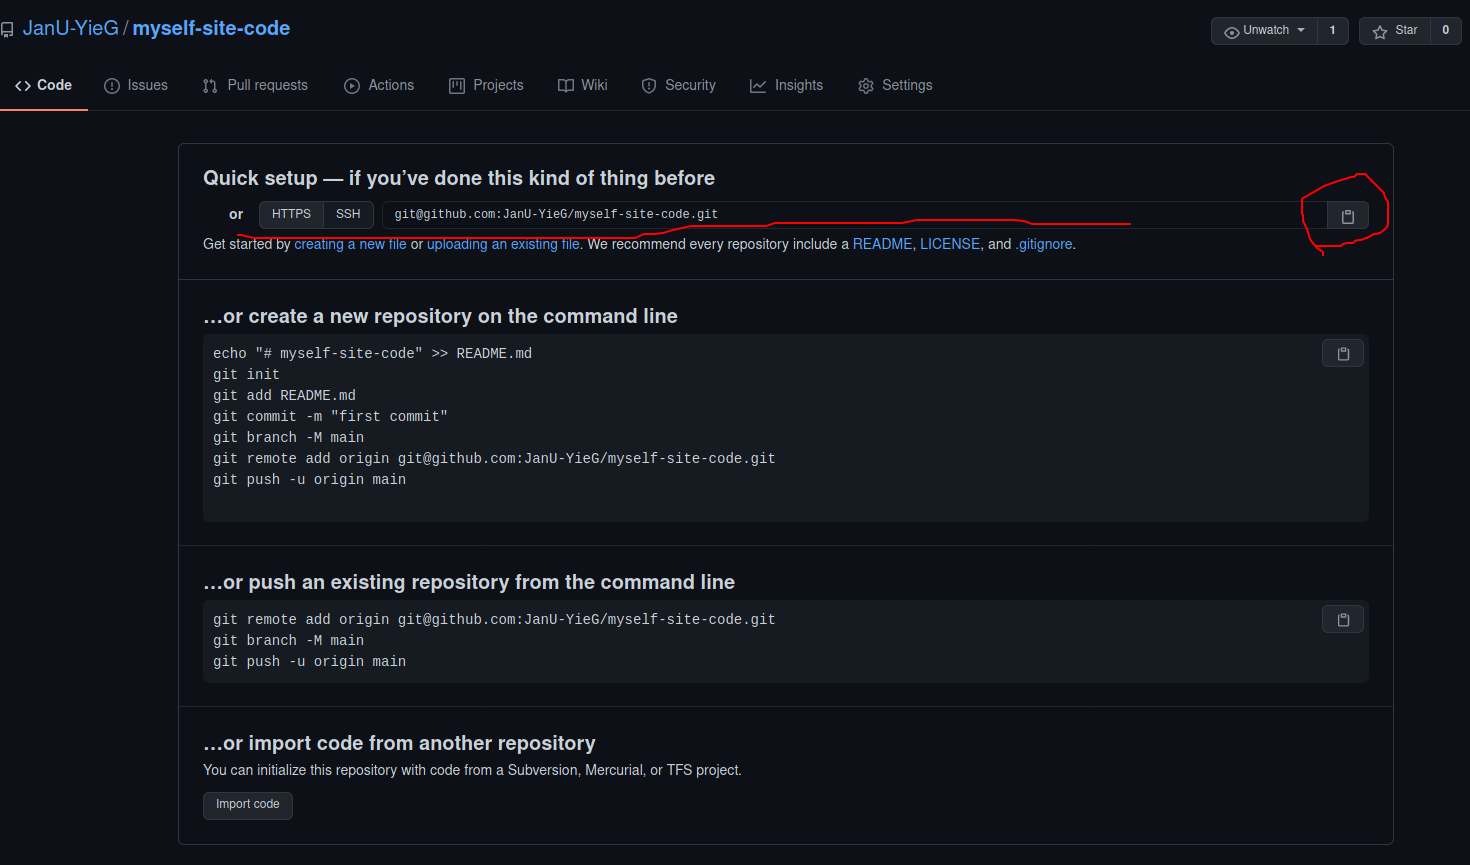
之后您将看到该repository的信息,其中ssh地址将是您使用git和github交互的地址,之后可以根据该地址将网站代码推送到github上

-
创建存放网站的代码repository
创建方式同上,但注意的是,仓库名称要为
您github名字.github.io
4).使用hugo在本地创建site
-
创建网站
1hugo new site my-site -
进入网站目录
1cd my-site -
添加一个网站主题
比如我选择Docsy主题
|
|
-
将主题配置到config.toml中
1echo 'theme = "docsy"' >> config.toml -
本地查看网站效果
1hugo server我生成的地址是http://localhost:1313/(默认地址)

-
如果没有问题,将你github上存储代码的仓库拉到本地
1git clone your-github-source-code-sshpath -
将上面使用
hugo生成的my-site目录中的文件全部复制到github clone的目录中1cp -r my-site/* git-clone-source-code-dir -
进入git clone 生成的目录中,并将代码推送到您的github存储网站源码的仓库
用cd命令进入到拉取的文件的目录
1cd git-clone-dir配置config.toml文件中的
baseUrl = <USERNAME>.github.io -
写文章
生成文章
1hugo new post/yourarticalname.md.md后缀表示markdown格式的文件,便于解析成网页
然后使用编写markdown文件的工具打开编写文章,比如:typora,mark text等工具
-
再次查看本地网站效果
hugo server
根据命令返回的地址查看
-
推送网站源码到对应仓库
1
2
3
git add . git commit -m 'first commit' git push origin main -
使用hugo生产网站代码
1hugo -t docsy其中docsy是我使用的主题,你需要换成你的
-
针对hugo生成的网站代码存储在public文件夹中,添加git submodule
1git submodule add -b main https://github.com/<USERNAME>/<USERNAME>.github.io.git public其中
https://github.com/<USERNAME>/<USERNAME>.github.io.git是你在github上创建的存放网站代码的仓库https地址 -
部署
创建deploy.sh文件,然后添加可执行权限,执行该文件即可部署网站
 1
 2
 3
 4
 5
 6
 7
 8
 9
10
11
12
13
14
15
16
17
18
19
20
21
22
23
24
25
#!/bin/sh # If a command fails then the deploy stops set -e printf "\033[0;32mDeploying updates to GitHub...\033[0m\n" # Build the project. hugo # if using a theme, replace with `hugo -t <YOURTHEME>` # Go To Public folder cd public # Add changes to git. git add . # Commit changes. msg="rebuilding site $(date)" if [ -n "$*" ]; then msg="$*" fi git commit -m "$msg" # Push source and build repos. git push origin main -
执行deploy.sh部署网站代码
1./deploy.sh -
代码上传成功你的网站搭建完毕
访问地址:https://USERNAME.github.io可以查看你的个人网站
2.shell脚本执行环境搭建
请稍等……
三.写文章
note:终端里使用英文输入法.
-
首先要网站目录里打开终端(terminal)
比如:我的网站目录放到了桌面(desktop)里,那么我先在终端里执行
cd进入到用户主目录,然后cd Desktop/chineselawyerjim-site-code进入到我的网站目录里。1 2cd cd Desktop/chineselawyerjim-site-code -
生成文章文件(生成要写的文章的markedown文件,文件后缀
.md)**Note:**生成的文章文件都在网站目录的content目录里面的posts目录下面,当然你也可以在posts目录下面创建新的目录用户文章分类。
eg:生成posts目录下的
.md文件。1hugo new posts/min-fa.mdeg:生成posts目录下创建目录并创建文件。
1hugo new posts/hunyinfa/hun-hou-cai-chan-jiu-fen.md这样就在posts目录下生成了
hunyinfa目录用于存放你想要存放的.md文件。如果以后你还想在
hunyinfa目录下生成别的文章,那么同上面一样执行。eg:
1hugo new posts/hunyinfa/other-posts.md -
在你的网站目录中通过鼠标点击找到上面创建的你要编写的文章,使用任意markdown文件编辑器进行编辑即可。
-
将写好的文章部署上去:
只需要在终端(第一步我们已经到了网站目录)执行
./push.sh命令就行了. -
总结
- 打开终端(terminal)
- 在终端中找到网站目录:
cd和cd Desktop/chineselawyerjim-site-code - 创建
.md格式文章文件:hugo new posts/min-fa.md - 回到网站目录文件用鼠标点击找到新建的文章
.md文件,使用任意markdown编辑器编辑文件。 - 部署网站:在终端(terminal)中执行
./push.sh即可。
-
其他
- 文章中插入图片(针对将图片上传到图床然后在文章需要插入该图片的地方插入markdown链接)
图床网站中注册自己的帐号,然后点击上传图片按钮,在网站对应的该图片中找到markdown链接,复制到文章中即可。(可能要双击图片才显示链接)
- 文章中插入链接(任意markdown编辑器都有这个功能)


